이번 포스팅은 BottomNavigationView를 사용하여 하단 탭을 구성하고 Fragment로 여러 화면을 분할해 볼 것이다.
BottomNavigationView는 https://material.io/components/bottom-navigation 를 참고한다.
구글에서 권장하는 주의사항이 있으니 잘 읽어보고 사용한다.
- 종속성 추가
프로젝트는 생성했다는 가정하에 진행한다. 위 두가지는 Gradle에 종속성을 추가해야 한다.
   ...

android {
    ...
}

dependencies {
    ....

    // material design(BottomNavigationView)
    implementation 'com.google.android.material:material:1.2.0'
}
* BottomNavigationView는 Material Design의 한 구성요소이다.
- BottomNavigationView의 menu.xml 생성
BottomNavigaionView의 아이템들은 안드로이드의 리소스 중 Menu로 정의된다.
res폴더 아래에 원하는 이름으로 menu.xml 을 만들자. 나는 편의상 navi_menu.xml 로 작성했다.
그리고 아래와 유사한 방식으로 작성한다.
<?xml version="1.0" encoding="utf-8"?>
<menu xmlns:android="http://schemas.android.com/apk/res/android"
    xmlns:app="http://schemas.android.com/apk/res-auto">
    <item
        android:id="@+id/first"
        app:showAsAction="ifRoom"
        android:enabled="true"
        android:icon="@drawable/ic_list"
        android:title="첫번째" />
    <item
        android:id="@+id/second"
        app:showAsAction="ifRoom"
        android:icon="@drawable/ic_pets"
        android:title="두번째" />
    <item
        android:id="@+id/third"
        app:showAsAction="ifRoom"
        android:enabled="true"
        android:icon="@drawable/ic_analytics"
        android:title="세번째" />
</menu>
여기서 사용할 icon들은 스스로 구하거나 @android:drawable/~ 를 통해서 사용하자.
예제에 사용된 이미지는 https://material.io/resources/icons/?icon=analytics&style=baseline에서 다운로드 하였다.
본인이 원하는 것을 다운로드 받아 추가하여 사용한다.
예제이기에 title을 바로 작성하였지만, values/strings.xml에 작성하여 사용하는 것이 좋다는 것을 인지하자.
- activity_main.xml 작성
MainAcitivty를 위한 activity_main.xml을 작성한다.
layout은 화면을 전환하며 Fragment를 담을 FrameLayout하나와 BottomNavigationView를 가지도록 한다.
아래와 같이 작성하자.
<?xml version="1.0" encoding="utf-8"?>
<androidx.constraintlayout.widget.ConstraintLayout
    xmlns:android="http://schemas.android.com/apk/res/android"
    xmlns:app="http://schemas.android.com/apk/res-auto"
    android:background="#FFFFFF"
    android:layout_width="match_parent"
    android:layout_height="match_parent">

        <FrameLayout
            android:layout_width="0dp"
            android:layout_height="0dp"
            android:id="@+id/fl_container"
            app:layout_constraintTop_toTopOf="parent"
            app:layout_constraintBottom_toTopOf="@+id/bnv_main"
            app:layout_constraintLeft_toLeftOf="parent"
            app:layout_constraintRight_toRightOf="parent"/>

        <com.google.android.material.bottomnavigation.BottomNavigationView
            android:layout_width="0dp"
            android:layout_height="?attr/actionBarSize"
            android:id="@+id/bnv_main"
            android:background="#FFFFFF"
            app:menu="@menu/navi_menu"
            app:layout_constraintBottom_toBottomOf="parent"
            app:layout_constraintLeft_toLeftOf="parent"
            app:layout_constraintRight_toRightOf="parent"/>

</androidx.constraintlayout.widget.ConstraintLayout>
BottomNavigationView의 menu 속성에 앞서 정의한 navi_menu.xml을 설정해준다.

실행하면 이러한 결과를 얻을 수 있다.
굉장히 간단하게 하단탭이 생성되었다. 아이템의 색깔을 변경하고 싶거나 하면 selector를 이용해야 한다. 이 예제에서는 생략한다.
- 분할할 화면 만들기
간단한 Fragment를 세 개 작성하자.
class FragmentOne : Fragment() {
    override fun onCreateView(
        inflater: LayoutInflater, container: ViewGroup?,
        savedInstanceState: Bundle?
    ): View? {
        // Inflate the layout for this fragment
        return inflater.inflate(R.layout.fragment_one, container, false)
    }
}
<?xml version="1.0" encoding="utf-8"?>
<FrameLayout xmlns:android="http://schemas.android.com/apk/res/android"
xmlns:tools="http://schemas.android.com/tools"
android:layout_width="match_parent"
android:layout_height="match_parent"
tools:context=".fragment.FragmentOne">
<TextView
android:layout_width="match_parent"
android:layout_height="match_parent"
android:gravity="center"
android:text="Fragment One!" />
</FrameLayout>위와 같이 정말정말 간단한 Fragment를 만들고 복붙으로 세 개를 만들자.
- BottomNavigationView 이벤트 처리
하단 탭이 눌렸을 때 화면을 전환하기 위해선 이벤트 처리를 해 주어야 한다.
MainActivity를 아래와 같이 작성한다.
class MainActivity : AppCompatActivity() {

    private val fragmentOne by lazy { FragmentOne() }
    private val fragmentTwo by lazy { FragmentTwo() }
    private val fragmentThree by lazy { FragmentThree() }

    override fun onCreate(savedInstanceState: Bundle?) {
        super.onCreate(savedInstanceState)
        setContentView(R.layout.activity_main)

        initNavigationBar()
    }

    private fun initNavigationBar() {
        bnv_main.run {
            setOnNavigationItemSelectedListener {
                when(it.itemId) {
                    R.id.first -> {
                        changeFragment(fragmentOne)
                    }
                    R.id.second -> {
                        changeFragment(fragmentTwo)
                    }
                    R.id.third -> {
                        changeFragment(fragmentThree)
                    }
                }
                true
            }
            selectedItemId = R.id.first
        }
    }

    private fun changeFragment(fragment: Fragment) {
        supportFragmentManager
            .beginTransaction()
            .replace(R.id.fl_container, fragment)
            .commit()
    }
}
fragment를 생성할 때 by lazy 키워드를 사용하였는데, 이는 프래그먼트가 최초로 사용될 때 초기화를 하는 "지연 초기화"를 의미한다.
굳이 by lazy를 사용하지 않고 private val fragmentOne = FragmentOne() 로 해도 무방하다.
BottomNavigationView의 경우 OnNavigationItemSelectedListener를 통해 탭 아이템 선택 시 이벤트를 처리할 수 있다.
navi_menu.xml 에서 설정했던 각 아이템들의 id를 통해 알맞은 프래그먼트로 변경하게 한다.
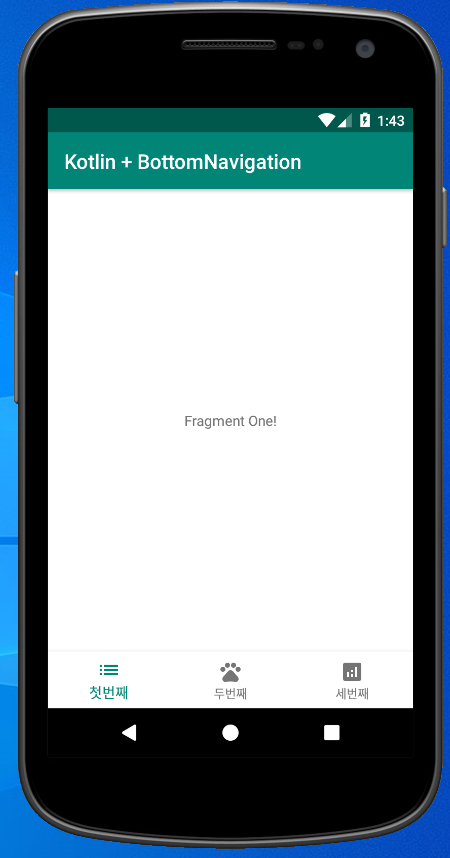
실행하면 위와 같이 첫번째 탭이 디폴트로 선택되어 있을 것이다. 두번째, 세번째 탭을 선택하면 프래그먼트가 변경 될 것이다.
BottomNavigationView를 사용하여 굉장히 간단하게 하단탭을 구성하고 탭 선택 시 화면을 변경하도록 처리할 수 있었다. 이를 바탕으로 화면마다 원하는 레이아웃을 구성하고 처리하면 될 것이다.
이런 기본적인 내용 외에도 공식 문서나 여러가지 자료를 참고하면 커스텀할 수 있는 여지가 많으니 잘 활용하길 바란다.
'개발 > Android' 카테고리의 다른 글
| [Android] Dependency Injection (a.k.a DI) - 1. 뭔데? 왜 하는데? Dagger? Koin? Hilt? (0) | 2020.10.24 |
|---|---|
| [Android] Kotlin + BottomNavigationView + Fragment + ViewPager2 사용하기 (0) | 2020.08.06 |
| [Android] MVVM + AAC + Coroutine + Retrofit + Github API 예제 (5) | 2020.07.13 |
| [Android] Fragment로 Activity 구성 및 통신 - 3 (0) | 2020.05.24 |
| [Android] Fragment로 Activity 구성 및 통신 - 2 (4) | 2020.05.23 |


