이번 포스팅에서는 프로젝트 생성, 패키지 구조 생성, 모델클래스 작성, 레이아웃 구성으로 이루어져 있다. 시작해보자.
- 프로젝트 생성
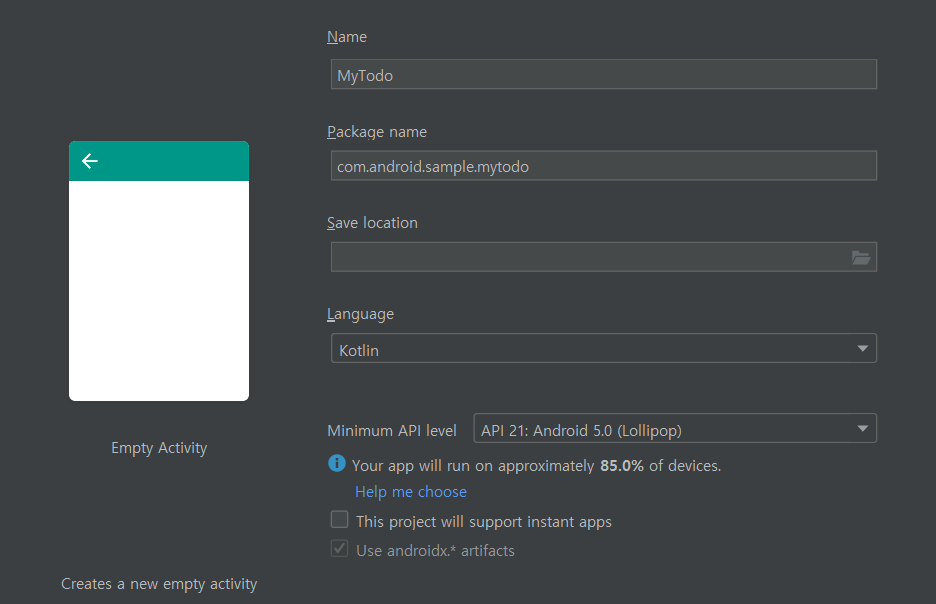
이 부분은 따로 설명이 필요 없다고 생각한다. Empty Activity로 MyTodo 라는 이름의 프로젝트를 생성한다.
패키지명이나 프로젝트의 경로는 개인이 알아서 설정하도록 하고, 언어는 Kotlin으로 한다.
Minimum API Level은 사실 샘플 프로젝트라 크게 의미가 없기 때문에 내가 자주 하는 API 21으로 두었다.
- 패키지 구조 생성
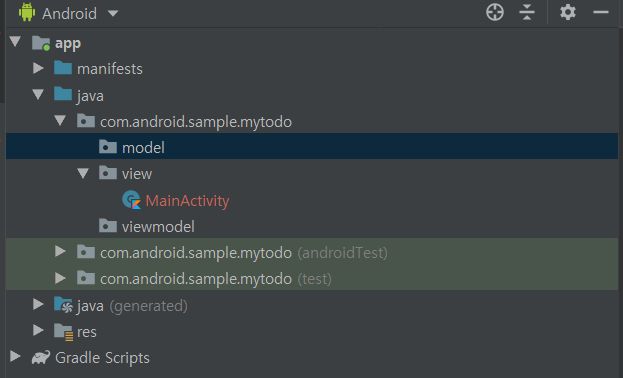
우리는 MVVM(Model-View-ViewModel) 패턴을 사용 할 것이다. 구분하여 보기 편하게 위와 같이 패키지 구조를 생성하고, View에 해당하는 MainActivity를 view 폴더로 옮긴다. 이 부분은 꼭 해야하는 것은 아니다.
- 모델 클래스 생성
data class TodoModel (
    var title: String,
    var description: String,
    var createdDate: Long
) {

}
model 폴더의 아래에 TodoModel 이라는 Kotlin 클래스를 만든다. 일반적으로 사용하는 class도 있지만 data class를 활용하였다. Todo 아이템에 대한 데이터를 보유하고 있는 모델 클래스이고 별도로 작업을 수행하지 않기 때문에 data class를 활용하는 것이 좋다. data class에 대하여는 구글링 해 보자. Todo 아이템은 제목과 설명, 생성 날짜의 데이터를 갖도록 하였다.
- Gradle에 RecyclerView 추가
App Module의 Gradle에 RecyclerView를 추가하자.
https://developer.android.com/jetpack/androidx/releases/recyclerview 에 따라
'androidx.recyclerview:recyclerview:1.1.0' 를 dependencies에 추가하자.
dependencies {
    implementation fileTree(dir: 'libs', include: ['*.jar'])
    implementation"org.jetbrains.kotlin:kotlin-stdlib-jdk7:$kotlin_version"
    implementation 'androidx.appcompat:appcompat:1.0.2'
    implementation 'androidx.core:core-ktx:1.0.2'
    implementation 'androidx.constraintlayout:constraintlayout:1.1.3'
    testImplementation 'junit:junit:4.12'
    androidTestImplementation 'androidx.test.ext:junit:1.1.0'
    androidTestImplementation 'androidx.test.espresso:espresso-core:3.1.1'

    implementation 'androidx.recyclerview:recyclerview:1.1.0'
}
위와 같이 추가 해 주어야 한다.
- MainAcitivty 의 Layout 구성
res 폴더의 layout아래에 activity_main.xml 파일을 수정하여 레이아웃을 구성한다. Todo를 추가하기 위한 추가 버튼과 RecyclerView를 포함하는 간단한 구성으로 만든다.
<?xml version="1.0" encoding="utf-8"?>
<androidx.constraintlayout.widget.ConstraintLayout xmlns:android="http://schemas.android.com/apk/res/android"
    xmlns:app="http://schemas.android.com/apk/res-auto"
    xmlns:tools="http://schemas.android.com/tools"
    android:layout_width="match_parent"
    android:layout_height="match_parent"
    tools:context=".view.MainActivity"
    android:padding="16dp">

    <Button
        android:layout_width="0dp"
        android:layout_height="wrap_content"
        android:text="추가"
        android:id="@+id/btn_add_todo"
        app:layout_constraintBottom_toBottomOf="parent"
        app:layout_constraintLeft_toLeftOf="parent"
        app:layout_constraintRight_toRightOf="parent"/>

    <androidx.recyclerview.widget.RecyclerView
        android:layout_width="0dp"
        android:layout_height="0dp"
        android:id="@+id/rl_todo_list"
        android:layout_marginBottom="16dp"
        app:layout_constraintRight_toRightOf="parent"
        app:layout_constraintLeft_toLeftOf="parent"
        app:layout_constraintTop_toTopOf="parent"
        app:layout_constraintBottom_toTopOf="@+id/btn_add_todo"/>

</androidx.constraintlayout.widget.ConstraintLayout>
ConstraintLayout을 활용한다. 전체적으로 Padding을 16dp 정도 주었다.
추가 버튼이 가장 아래에, 그 위에 RecyclerView가 있는 형태이다.
- RecyclerView의 Item Layout 만들기
Todo Item을 화면에 표현하기 위한 Layout을 만든다. 이 Layout은 RecyclerView의 아이템들이 사용 할 것이다.
res의 layout 아래에 item_todo.xml 을 만들고 아래와 같이 작성한다.
<?xml version="1.0" encoding="utf-8"?>
<androidx.constraintlayout.widget.ConstraintLayout
    xmlns:android="http://schemas.android.com/apk/res/android"
    xmlns:app="http://schemas.android.com/apk/res-auto"
    android:orientation="vertical"
    android:layout_width="match_parent"
    android:layout_height="wrap_content"
    android:padding="8dp">

    <TextView
        android:layout_width="0dp"
        android:layout_height="wrap_content"
        android:id="@+id/tv_todo_title"
        android:textSize="16dp"
        android:textColor="#000000"
        android:text="Todo Title"
        app:layout_constraintLeft_toLeftOf="parent"
        app:layout_constraintRight_toRightOf="parent"
        app:layout_constraintTop_toTopOf="parent"/>

    <TextView
        android:layout_width="0dp"
        android:layout_height="wrap_content"
        android:id="@+id/tv_todo_description"
        android:textSize="12dp"
        android:textColor="#808080"
        android:text="Todo Description"
        app:layout_constraintLeft_toLeftOf="parent"
        app:layout_constraintRight_toRightOf="parent"
        app:layout_constraintTop_toBottomOf="@+id/tv_todo_title"/>

    <TextView
        android:layout_width="0dp"
        android:layout_height="wrap_content"
        android:id="@+id/tv_todo_created_date"
        android:textSize="10dp"
        android:textColor="#cccccc"
        android:text="Todo Created Date"
        app:layout_constraintLeft_toLeftOf="parent"
        app:layout_constraintRight_toRightOf="parent"
        app:layout_constraintTop_toBottomOf="@+id/tv_todo_description"/>

</androidx.constraintlayout.widget.ConstraintLayout>
투두 아이템의 제목, 설명, 생성날짜를 표현하는 간단한 레이아웃 구성이다.
글자색이나 사이즈 등은 colors, dimens등을 활용하는 것이 좋으나 샘플이므로 생략한다.
- 다음으로
다음으로는 RecyclerView를 위한 어댑터와 뷰홀더를 생성하고 임의로 데이터를 생성하여 리스트를 구현하고 "추가" 버튼으로 리스트에 아이템을 추가하도록 할 것이다.
'개발 > Android' 카테고리의 다른 글
| [Android] Kotlin + MVVM + AAC 로 Todo 앱 만들기 - 5 (8) | 2020.03.08 |
|---|---|
| [Android] Kotlin + MVVM + AAC 로 Todo 앱 만들기 - 4 (0) | 2020.03.01 |
| [Android] Kotlin + MVVM + AAC 로 Todo 앱 만들기 - 3 (0) | 2020.02.29 |
| [Android] Kotlin + MVVM + AAC 로 Todo 앱 만들기 - 2 (3) | 2020.02.29 |
| [Android] Kotlin + MVVM + AAC 로 Todo 앱 만들기 - 0 (0) | 2020.02.29 |